Thursday, May 8, 2014

Thursday, September 26, 2013
toon hole
This is a good resource for looking at posing, staging and simple storytelling.
http://www.toonhole.com/
http://www.toonhole.com/
Tuesday, September 10, 2013
breaking the joint
in animation, the breaking of a jointed limb is key to showing force travel through the limb.
when an object such as an arm moves through space, the limbs attached below will drag behind until the primary limb has either slowed down, stopped or changed direction. when this occurs, the lower limb will keep moving due to the momentum built up by the primary limb. as the limb swings past the centre line of the primary limb the joint has been broken.

going to the life action ref, you notice the drag occuring in the 2ndary limb (blue) by the straightening out of the arm. Although the movement is slight, this straightening out is what gives the arm its flexibiltiy and ability to generate force through it. as the arm reaches its extreme fwd movement it slows down and the secondary limb to catches up with it. the movement is slight and appears stiff when it is copied.


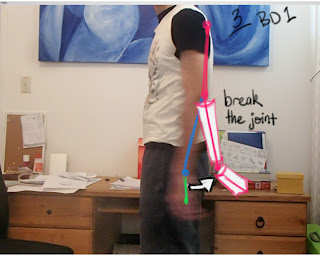


when an object such as an arm moves through space, the limbs attached below will drag behind until the primary limb has either slowed down, stopped or changed direction. when this occurs, the lower limb will keep moving due to the momentum built up by the primary limb. as the limb swings past the centre line of the primary limb the joint has been broken.

going to the life action ref, you notice the drag occuring in the 2ndary limb (blue) by the straightening out of the arm. Although the movement is slight, this straightening out is what gives the arm its flexibiltiy and ability to generate force through it. as the arm reaches its extreme fwd movement it slows down and the secondary limb to catches up with it. the movement is slight and appears stiff when it is copied.

studying the swing of a human arm you will notice that there is not the xtreme joint breaking as depicted in animations. but its is still important to examine real life movement and see where the oppurtunity for joint breaking can occur.

take that breakdown drawing of the arm mid swing, what if we drag that secondary limb so it passes the upper arms cog, thus "breaking" the joint.

when we jump to the extreme forward position we feel the force more clearly being exerted through the arm.

the arm swing now feels more loose and flexible.

Monday, September 2, 2013
surprise take
shot some ref to get poses i liked
 thumbnailed the action. the final pose took me a few go's to get right.


took thumbs and posed out keys. captured and timed in flipbook
redrew keys and added some breakdowns
the rope pull
Planning:
video reference
Before jumping in to any
animation, i usually plan it out beforehand. It is important to understand the
body mechanics of an action. Therefore it is often best to act it out and/or
gather reference.
In this case i couldn’t find
the kind of reference i wanted on YouTube, so i filmed the action out myself:
Analyzing the reference
From here i studied the
motion and extracted the key moments of the footage. It is important to train
your eye to understand what these key moments are. I look for things such as:
point of direction change in body, extreme high and low points of the hips and
when the foot contacts the ground.


Now i have this information i will start to thumbnail these poses and make
notes. when i thumbnail, i start by drawing the line of action of each pose, then draw the hips, torso,
head, legs and arms in that order. This helps me to understand the forces at
work.
I then adjust the drawings and make notes, i will have this next to me
while i animate so i can refer back to it while i am working on a pose. I also
make little notes on the timing using timing charts.

Layout:
Once i am fairly confident with the specifics of the action, i then create
a layout of the animation. The purpose of this is to map out the parameters of
the movement through the shot. Here i am thinking about how each pose will flow
in to the next. This will sit at the bottom of my pile of paper as i draw in my
key poses.

Animation:
Laying in the keys.
Using the layout as guide, i sketched in my key poses on the light table. I
drew these in the same way i tumbnailed, doing a straight ahead pass on the
l.o.a then hips, torso etc.
Flipping the poses back and forth
allowed me to see the poses working together and i could see where i needed to
adjust. Note the more extreme pose drawn at 37.
I also drew timing charts on keys: 10, 19 and 27. I changed the timing
later in the computer but they were a good starting point.

Breaking it down:
Now it’s time to break the poses down. These secondary poses help to define
the movement. The breakdown serves 3 basic functions: favouring, arcs and
overlap. I refer to the notes made in my thumbnails as well my timing charts
for their placement.

Flipbook.
Now i have all the keys and breakdowns done, i shoot the animation and
bring it into flipbook and apply the timing
For the most part timing works ok but i shuffle the frames around a bit to
tweak timing. then i redraw the keys and bd's in flipbook and do a pass of
inbetweens to flesh out the movement some more.
Stagger effect.
Now that i have the ease worked out to show the tension on the rope, it's
time to shuffle the frames around in flipbook to convey more effort is being
put into pulling on the rope. The way to achieve this is to take all the frames
after the point the rope goes taught and interleave the frames. The method in
this case is to jump ahead two frames then back one. I do this until i have
reached the final frame.
I draw in a drop shadow and
background to give it a bit of context and have also gave the character a bit
of antic before moving backwards. I still need to spend more time refine the
inbetweens and cleaning up the animation but it will do for now.
Monday, August 19, 2013
flour sack animation
great flour sack animation by Ron Zorman. to me it's a reminder how strong posing can take you so far to success with animation.
http://vimeo.com/40129870
http://vimeo.com/40129870
Sunday, June 9, 2013
Subscribe to:
Posts (Atom)
